The Easy Way to Better Landscape Photography

On Saturday, July 26th, member Amy Kosh gave a terrific workshop on how to better photograph our gardens. Despite grey skies, eleven members showed up cameras in hand at the Cornell Cooperative Demo Gardens in Stony Point, NY. Ms. Kosh, who has taught photography at the university level for over 17 years, walked the participants through how to get the most out of digital, point and shoot cameras. There were some visual exercises that focused attention on how to create interesting framing within the images, paying attention to what is in the corners of your frame before shooting. Paying attention to the background and how they interact with your subject was discussed and practiced as well.
Technical aspects of the cameras were brought into play as participants got themselves into the camera manual modes and started to work with what differences apertures make. Histograms were introduced and explained with examples of what to look for. You can see some examples below illustrating some of the major the points covered.
When in “Landscape” Mode on your camera you get a deep depth of field. Similar to setting your manual camera on F/22 or F/ 16. Notice foreground and background are in acceptable focus.

fig. A
Without moving the point of focus on the camera, we changed to “Close-up” or Macro Mode. Note how the depth of field is sharply reduced here. The only plane in acceptable focus is the one we actually set our camera lens to focus upon. This is equivalent to setting your manual camera on F/3.5 or F 4.

fig. B
Histograms:
If you have ever wondered what that funny little graph is that shows up on your screen after you shoot, wonder no more. It is called a histogram and it tells you lots of very helpful information about your image.
Here are some examples of what a histogram can tell you about your images.
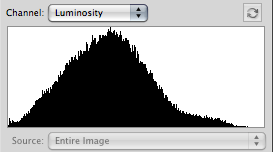
This first histogram is from the above fig. A image.

The left side represents the darkest areas of your image; the right side represents the lightest areas. So we can tell from looking at this histogram that our image has a little bit of the image that is very dark, a little that is very light. Most of our fig. A image falls in the middle range. Meaning most of the image is neither very dark, nor very light.

fig. C
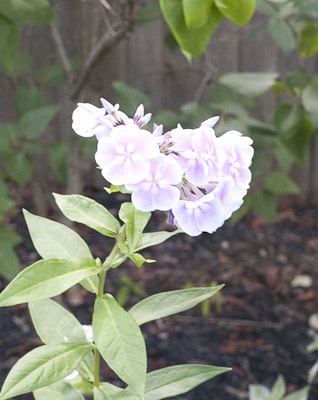
In fig. C we can see that there is more light area than dark. The histogram confirms this.

The trouble with this image, and what the histogram warns us about, is the lightest areas. In this case those white blooms. We can see in this enlargement that the blooms actually have some color to them. But in the original image they were all washed out. Too much light. To get the flower to show the real color in the bloom we had to change the aperture setting and slightly under-expose the image.

Now the histogram shows us that we are not “clipping” (losing and information) in the lightest areas. Those to the right side of the histogram. We still have lots of great information in the darkest areas, those to the left side of the histogram.
Even if you can’t change the settings manually on your digital point and shoot camera, you can fool the camera into changing them. If you take a picture and see the histogram showing that you have “blown” the highlights, washing them out with too much light. Simply point your camera closer into the very lightest area of the picture, hold the shutter button down halfway as you allow the camera to focus, them without removing your finger from the shutter release button, snap the picture. The camera will always try to make the image fall in the middle of the histogram, so by showing the camera more light objects than dark ones; you fool it into giving you more information about the lightest areas.
Try playing around with your images and looking at the histograms until you start to see how easy they can be to read.
One other point about images.
If you have some very large files that you’d like to send to someone in an email and find that they keep getting rejected because the size is to big. You can use your web browser to go to a site such as http://www.yousendit.com/
This is a free service (If you use the basic service only). Sign up, and then follow the simple directions for sending your large image files to your friends. They will receive an email telling them to pick up their image from the website. Truly a handy thing to know about.
While we were photographing we also noticed some lovely Knautia blooms.
For those unfamiliar with this plant I include some information here along with a link for more.


Common Name: knautia
Zone: 5 to 9
Plant Type: Herbaceous perennial
Family: Dipsacaceae
Native Range: Central Europe
Height: 1.5 to 2 feet
Spread: 1.5 to 2 feet
Bloom Time: July – September
Bloom Color: Burgundy
Sun: Full sun
Water: Medium
Maintenance: Low
General Culture:
Easily grown in average, medium, well-drained soil in full sun. Somewhat intolerant of the heat and humidity of the deep South. Remove spent flowers to encourage rebloom in early autumn. May self-seed under optimum conditions.
Noteworthy Characteristics:
Knautia is an upright, clump-forming, somewhat short-lived perennial which typically grows 1.5-2′ tall. Features deep purplish-red, domed, scabiosa-like flower heads (to 1.5″ across) atop slender, branching stems. Deep green leaves are lightly lobed at the base of the plant, but deeply divided higher up. Long early summer to fall bloom period. Good fresh cut or dried flower.
Problems:
No serious insect or disease problems. Plants may decline considerably by late summer in hot southern climates.
Uses:
Mass in borders, cottage gardens, meadows or naturalized areas.
Information provided by: Missouri Botanical Garden, 2001-2009
Read Full Post »


